Welcome to Part 1 of the three-part series: A Step-by-Step Guide Building Your Personal Website with Jekyll and GitHub Pages.
In this post, you’ll learn how to get your personal website up and running with Jekyll and GitHub Pages. By the end, you’ll have a live portfolio website setup and hosted on GitHub Pages, using a pre-configured Jekyll theme to help you get started quickly and easily.

Launch Your Personal Website with Jekyll and GitHub Pages
Steps:
1. Create a GitHub Repository
Login to GitHub and create a new repository. The repository name should follow the format your-github-username.github.io. For example, if your GitHub username is ‘curios-it’, the repository should be named ‘curios-it.github.io’. This naming convention ensures that your website will be hosted at https://curios-it.github.io once it’s live on GitHub Pages.
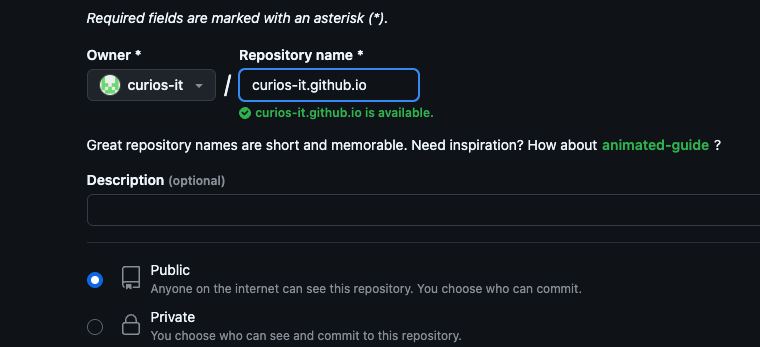
Note: I shall use this example throughout the tutorial. Remember to replace curios-it with your own GitHub username.
Setting Up the Project Directory
You can create your project locally anywhere in your machine. But to keep things consistent in this demo, create a new directory which will be called your project directory. We will call it /path/to/project-directory/.
Ensure you are in the correct folder before you get started:
cd /path/to/project-directory/
2. Install Jekyll
Jekyll is a static site generator that transforms plain text into a complete website. It’s simple to use, highly customisable, and works seamlessly with GitHub Pages for hosting your website for free. Written in beginner-friendly formats like Markdown, it’s perfect for personal portfolios.
To install Jekyll locally, follow the official installation guide at this link: Jekyll Installation .
3. Initialise a New Jekyll Website Locally
Most themes you come across recommend forking the theme repository, renaming it and working directly within it. While this is the quickest way to get started, it limits your ability to switch themes in the future. I wouldn’t recommend this approach because adding your content directly to the theme repository is not modular and makes future updates more challenging.
In the Terminal (or Command Prompt for Windows users), confirm that you have the recommended versions used for Jekyll and then initialise the local Jekyll project in the project-directory like this:
jekyll new curios-it.github.io
cd curios-it.github.io
4. Configure Your WebSite
Open _config.yml in your preferred IDE and update basic settings:
    title: My Curious Website
    author: Curios Me
    description: An awesome website created within minutes using Jekyll
    baseurl: ""
    url: ""
baseurl- if the site is hosted on a subdirectory likehttps://example.com/curios-it.url- if you’re hosting your site on a custom domain.
Note: Jekyll uses a default theme, specified by the theme: minima line in the _config.yml file. We will change this later in the tutorial.
5. Build and Serve Your Website Locally
If everything is setup correctly, you should be able to preview your website locally in a browser. Run the following commands and then visit http://localhost:4000/ to test your website.
bundle exec jekyll build
bundle exec jekyll serve
6. Understand folder structure
Now that we have the website set up, understanding the folder structure is essential for navigating and customising your Jekyll site efficiently.
About Markdown and File Extensions
- If you are new to Markdown, consider learning the basics with this interactive workshop . It provides hands-on practice to help you get comfortable with Markdown quickly.
- Optionally, rename any .markdown files in your directory to .md extension for simplicity and consistency. .md is also widely recognised for Markdown files.
Now, let’s take a look at the folder structure.
_config.yml: The configuration file where site-wide settings like title, URL, and theme are defined.index.md: The homepage content of your website.assets/: A folder for images, styles, scripts, and other static files._posts/: Contains blog posts. We’ll cover this in detail in the next article._drafts/: (Optional) Unpublished posts. Drafts can be previewed locally but won’t appear on the live website._site/: The folder where Jekyll builds your static site. It gets regenerated every time the website is built.Gemfile: A file used to manage the Ruby gems (plugins and dependencies) required by your Jekyll site.
Some folders are not actively used in our current setup but are part of the theme’s repository. They play a key role in advanced customisation:
_layouts/: Defines the structure of your website’s pages. Layouts use placeholders for dynamic content insertion._includes/: Stores reusable HTML snippets (e.g., headers, footers) to be included in layouts or pages.
7. Customise Layouts and Pages
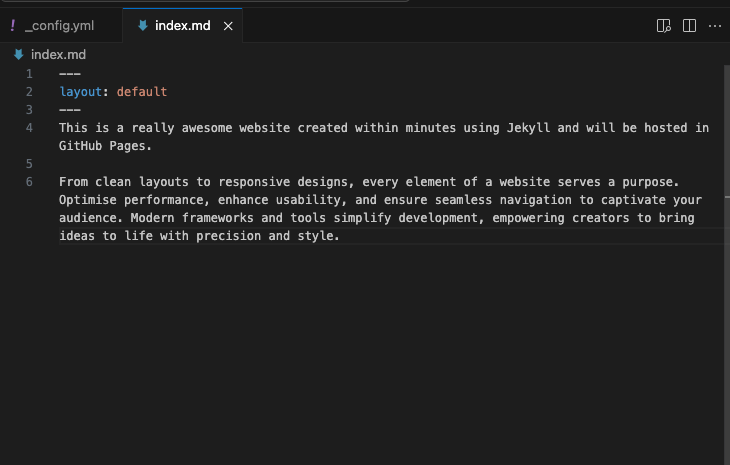
Let’s take a closer look at index.md, which is the home page content for the website.
Front Matter
The section enclosed within --- triple dashes at the top of the file is called Front Matter. This is where you define metadata and page specific settings using predefined or custom variables. Learn more about Front Matter .
---
layout: home
---
Layouts
Layouts are templates that structure your website’s pages. A common convention is to use a base layout called default.html from which other layouts can inherit. You can find the available layouts in your theme’s _layouts directory.
The default theme uses a layout called home for the home page. Since we plan to customise the theme later, let’s switch to default layout for now. Update the front matter with layout: default.
---
layout: default
---
Below the front matter, add some text to test the layout.
Test these changes by serving it. For easier testing, you can use the --livereload flag to make the website reload everytime you make changes.
bundle exec jekyll serve --livereload
Note that changes to _config.yml require rebuilding manually.
8. Add and Update Additional Pages
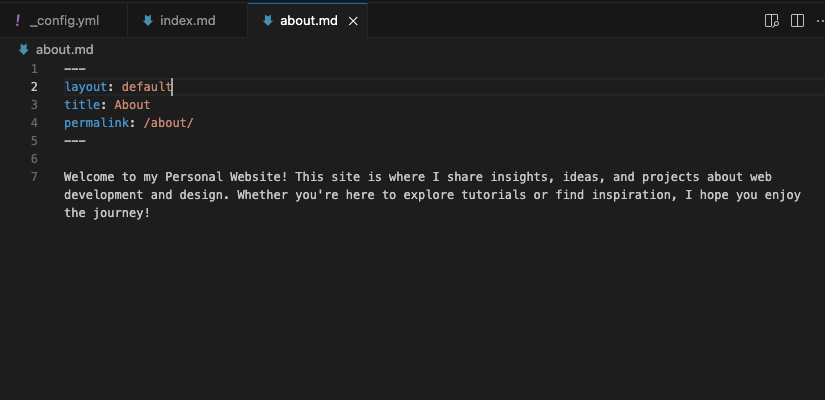
Now that we have a simple website set up, it’s time to start adding content. Let’s make the “About” page consistent with our customisation by updating about.md file:
---
layout: default
title: About
permalink: /about/
---
In this YAML Front Matter section, you’ll find some additional settings:
titlesets the page title.permalinkdefines the URL path for the page, appended to theurlvariable set in the_config.ymlfile.
Similarly, let’s create a “Contact” page. Add a new file named contact.md and include the following:
---
layout: default
title: Contact
permalink: /contact/
---
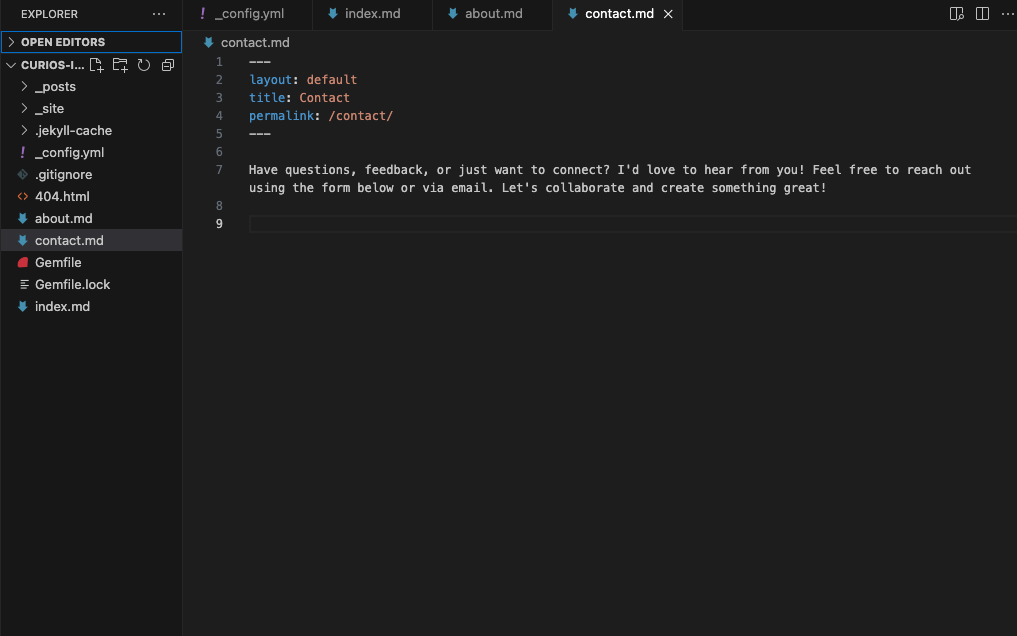
With this addition, your “Contact” page is ready and integrated seamlessly into your website.
9. Prepare for GitHub Pages
Update Gemfile to use the github-pages gem. Uncomment the following line:
gem "github-pages", group: :jekyll_plugins
Since the github-pages gem manages the Jekyll version, you should remove or comment out this line to avoid conflicts:
# gem "jekyll" # remove or comment this line
Run the following commands to install the gems, then build and serve to test the website before pushing to GitHub.
bundle install
bundle exec jekyll build
bundle exec jekyll serve --livereload
10. Commit and Push to GitHub
Now your website is ready to roll. To commit and push the changes to the repository you created in GitHub, run the following commands in your terminal:
git init
git remote add origin https://github.com/curios-it/curios-it.github.io
git add .
git commit -m "Initial commit"
git push origin main
If you are new to Git or need a refresher on how it works, I recommend checking out this simple Git tutorial to better understand the commands and workflow.
11. View Your Live Website
Once the deployment is complete, your website should be live! You can access it by navigating to https://curios-it.github.io (your-github-username.github.io) to view your site.
Note: It takes a couple of minutes for the changes to be live. If it takes longer than that, be sure to check that everything was pushed correctly to the repository and try again after a few minutes.
This post is part 1 of the series: A Step-by-Step Guide Building Your Personal Website with Jekyll and GitHub Pages. Check out the other parts to complete your journey!
Part 1: Launch Your Personal Website with Jekyll and GitHub Pages (This Post)
Part 2: Personalise Your Jekyll Website with Themes and Layouts
Part 3: Manage Content and Theme Updates Separately Using Git Remotes